AliYun Code And TortoiseGit

TortoiseGit默认使用TortoiseGitPlink作为ssh客户端(类似putty, 使用ppk格式的key),阿里云居然不支持。先把失败的尝试记录一下:

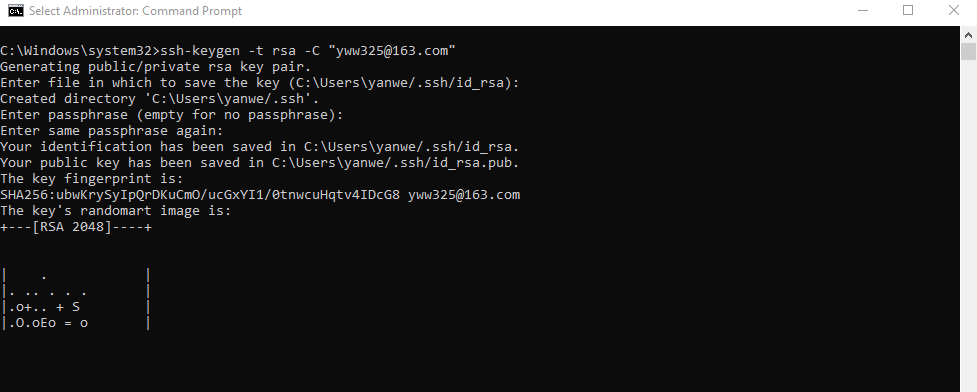
首先无论用哪个ssh客户端,必须先生成ssh key: id_rsa到默认users\…\.ssh目录下 ,并上传public key到阿里云:

但是git clone总是中途失败,可能网络不好或者别的原因,而且也想用GUI工具,所以拿出TortoiseGit

右键Setting模式用的是Plink:

转换open ssh key到ppk格式

然后用TortoiseGit创建本地Repo空目录, 新增remote配置:

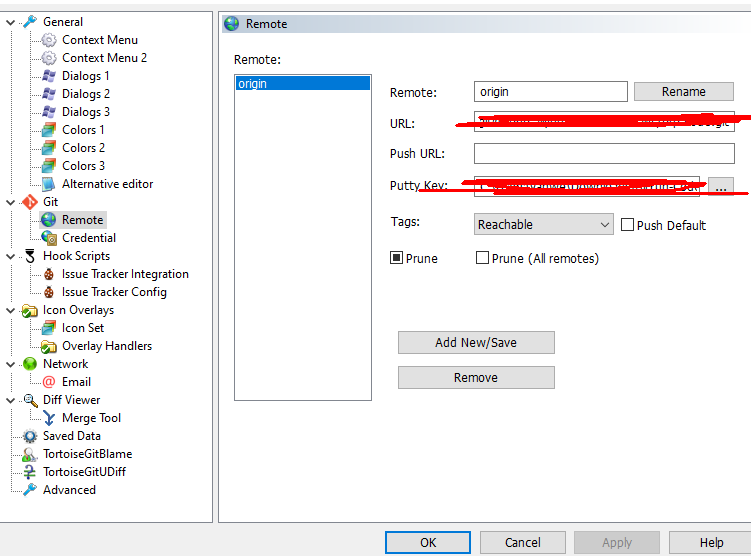
但是fetch或者pull不下来(卡住一段时间后)。报错:fatal: protocol error: bad line length character: Welc, 网上查了一下还是git服务器 response不匹配。

看来阿里云的GitServer真的不支持ppk格式的ssh key。只能放弃, 把图二里的ssh client设定改为默认的C:\Program Files\Git\usr\bin\ssh.exe

然后TortoiseGit就满意了


Reference:

https://help.aliyun.com/document_detail/57904.html 官方

https://developer.aliyun.com/article/483601 改ssh client

https://help.cloudforge.com/hc/en-us/articles/215243143-Configure-TortoiseGIT-client-to-work-with-SSH-keys-on-Windows


iptables reference

http://www.linuxhomenetworking.com/wiki/index.php/Quick_HOWTO_%3a_Ch14_%3a_Linux_Firewalls_Using_iptables#Masquerading_.28Many_to_One_NAT.29

不仅介绍了基本的命令行参数和背后的含义,还说明了这个package运行的前置条件:别忘了设置:

#---------------------------------------------------------------
# Load the NAT module
#
# Note: It is best to use the /etc/rc.local example in this
#       chapter. This value will not be retained in the
#       /etc/sysconfig/iptables file. Included only as a reminder.
#---------------------------------------------------------------
 
modprobe iptable_nat
 
#---------------------------------------------------------------
# Enable routing by modifying the ip_forward /proc filesystem file
#
# Note: It is best to use the /etc/sysctl.conf example in this
#       chapter. This value will not be retained in the
#       /etc/sysconfig/iptables file. Included only as a reminder.
#---------------------------------------------------------------
 
echo 1 > /proc/sys/net/ipv4/ip_forward

云主机上ubuntu linux设置VSFTPD的坑备忘

常规安装一个软件的流程:

安装工具先更新:

apt-get update

安装ftp软件:

apt install vsftpd

备份原始配置文件:

cp /etc/vsftpd.conf /etc/vsftpd.conf_default


添加成系统启动服务

systemctl start vsftpd
systemctl enable vsftpd

编辑:

nano /etc/vsftpd.conf


需要编辑的地方:

# Uncomment this to allow local users to log in. 使用本地用户
local_enable=YES

# Uncomment this to enable any form of FTP write command. 否则无法上传
write_enable=YES

# You may restrict local users to their home directories. See the FAQ for
# the possible risks in this before using chroot_local_user or
# chroot_list_enable below.  //限制本地用户到home/用户名 目录, 不限制就会list出/Home/用户名这样的结构
chroot_local_user=YES

//ftp client如fileZilla等一般都支持被动模式,20和21端口只用于初始连接和管理。真正上传下载都用这些端口,下面这些要设置

pasv_min_port=12001
pasv_max_port=12005
pasv_enable=Yes

// 这个不设会返回550 错误,无法list根目录,参考https://askubuntu.com/questions/349857/trying-to-connect-to-vsftpd-failed-to-retrieve-directory-listing
allow_writeable_chroot=YES

编辑好之后可以重启服务尝试

service vsftpd stop

service vsftpd start

(或service vsftpd restart)

https://serverfault.com/questions/421161/how-to-configure-vsftpd-to-work-with-passive-mode

提到要 iptables -I INPUT -p tcp –dport 12001:12005 -j ACCEPT , 但好像不需要,默认的云服务器是允许的。可以用iptables –list确认。


结果发现不行,还要去阿里云的安全组策略打开端口tcp 20, 21, 以及范围 12001/12005 。

然后用useradd和passwd命令增加一个常规用户即可。

然后发现虽然可以list目录了,但是没法上传。553 Could not create file. – permissions?

简单粗暴地用root到home/新用户目录下chmod 777 . 完事。